五、文件上传
1、服务端
文件上传需要服务端的配合。我们可在本机搭建tomcat测试环境。关于tomcat在Mac
OSX下的安装配置,参考作者另一博文《安装Tomcat到Mac OSX》。
打开Eclipse,新建web工程。在其中新建一个Servlet
UploadServlet:
import
java.io.*;
import
java.util.*;
import
javax.servlet.ServletException;
import
javax.servlet.http.HttpServlet;
import
javax.servlet.http.HttpServletRequest;
import
javax.servlet.http.HttpServletResponse;
import
org.apache.commons.fileupload.FileItem;
import
org.apache.commons.fileupload.disk.DiskFileItemFactory;
import
org.apache.commons.fileupload.servlet.ServletFileUpload;
public
class
UploadServlet
extends
HttpServlet {
private
boolean
isMultipart
;
private
String
filePath
,
title
;
private
int
maxFileSize
= 500 * 1024;
private
int
maxMemSize
= 4 * 1024;
private
File
file
;
public
void
init( ){
//
从
web.xml
的
context_param
中获得上传文件目录(
/data
)
.
filePath
=
getServletContext().getInitParameter(
"file-upload"
);
}
public
void
doPost(HttpServletRequest request,
HttpServletResponse response)
throws
ServletException,
java.io.IOException {
//
检查表单是否带有
ENCTYPE="multipart
/form-data"
isMultipart
=
ServletFileUpload.isMultipartContent
(request);
response.setContentType(
"text/html"
);
response.setCharacterEncoding(
"GBK"
);
java.io.PrintWriter out = response.getWriter( );
if
( !
isMultipart
){
out.println(
"<html>"
);
out.println(
"<head>"
);
out.println(
"<title>Servlet upload</title>"
);
out.println(
"</head>"
);
out.println(
"<body>"
);
out.println(
"<p>No file uploaded</p>"
);
out.println(
"</body>"
);
out.println(
"</html>"
);
return
;
}
DiskFileItemFactory
factory =
new
DiskFileItemFactory();
//
内存最大可缓存尺寸
factory.setSizeThreshold(
maxMemSize
);
//
指定当数据超过内存最大可缓存尺寸时,临时文件的目录
factory.setRepository(
new
File(
filePath
+
"temp"
));
//
文件上传对象
ServletFileUpload upload =
new
ServletFileUpload(factory);
//
设置文件上传最大允许尺寸
upload.setSizeMax(
maxFileSize
);
try
{
out.println(
"<%@page
contentType='text/html; charset=GBK'%>"
);
out.println(
"<html>"
);
out.println(
"<head>"
);
out.println(
"<title>Servlet
upload</title>"
);
out.println(
"</head>"
);
out.println(
"<body>"
);
//
获取
multipart
/form-data
内容,其中每个
field
被分成不同
part
List
fileItems = upload.parseRequest(request);
//
枚举每个
field
Iterator
i = fileItems.iterator();
while
( i.hasNext () )
{
FileItem fi = (FileItem)i.next();
if
( !fi.isFormField
() )
//
如果
field
为
File
{
//
获取
field
的
name
或
id
String fieldName
= fi.getFieldName();
String fileName = fi.getName();
//
文件名中文处理
fileName=
new
String(fileName.getBytes(),
"gbk"
);
out.println(
"file name:"
+fileName+
"<br>"
);
String contentType
= fi.getContentType();
boolean
isInMemory
= fi.isInMemory();
long
sizeInBytes
= fi.getSize();
//
把上传数据写入本地磁盘
if
(
fileName.lastIndexOf(
"//"
) >= 0 ){
file
=
new
File(
filePath
+
fileName.substring( fileName.lastIndexOf(
"//"
))) ;
}
else
{
file
=
new
File(
filePath
+
fileName.substring(fileName.lastIndexOf(
"//"
)+1)) ;
}
fi.write(
file
) ;
out.println(
"Uploaded Filename:
"
+ fileName +
"<br>"
);
}
else
{
//
如果
field
为
Form Field
title
=fi.getFieldName();
if
(
title
.equals(
"title"
)){
title
=
new
String(fi.get(),
"gbk"
);
out.println(
"title:"
+
title
+
"<br>"
);
}
}
}
out.println(
"</body>"
);
out.println(
"</html>"
);
}
catch
(Exception ex) {
System.
out
.println(ex);
}
}
public
void
doGet(HttpServletRequest request,
HttpServletResponse response)
throws
ServletException,
java.io.IOException {
throw
new
ServletException(
"GET method used with "
+
getClass( ).getName( )+
": POST
method required."
);
}
}
再新建一个upload.jsp页面作为测试:
<%@
page
contentType
=
"text/html; charset=GBK"
language
=
"java"
import
=
"java.util.*"
%>
<
html
>
<
head
>
<
title
>
fbysss
UploadBean
示例
</
title
>
<!--meta http
-equiv
="Content-Type"
content="text/html
; charset
=iso
-8859-1"-->
<!--meta http
-equiv
="Content-Type"
content="text/html
; charset
=gb2312"-->
</
head
>
<
FORM
name
=
"form1"
METHOD
=
"POST"
ACTION
=
"UploadServlet"
ENCTYPE
=
"multipart/form-data"
>
<
input
name
=
"title"
type
=
"text"
value
=
"
请选择文件
"
>
<
p
>
附件
</
p
>
<
p
>
<
input
name
=
"attach"
type
=
"FILE"
id
=
"attach"
size
=
"50"
>
</
p
>
<
input
name
=
"ok"
type
=
"submit"
value
=
"
提交
"
>
</
form
>
</
html
>
将工程部署到tomcat中,启动tomcat,访问
http://localhost:8080/test/upload.jsp
,显示界面如下:
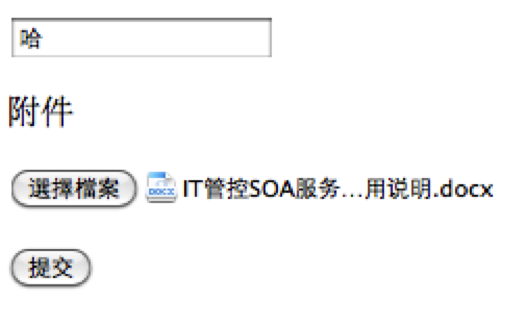
选择一个文件进行上传,然后到/data目录下检查该文件是否上传成功。
2、iPhone客户端
新建类,选择UIViewController subclass,并勾上“With
XIB for user interface”,命名为 UploadViewController。
用 IB 打开 Xib 文件,在其中拖入1个 UIToolBar 、1个
UIBarButtonItem 和1个 UIWebView、1个UIProgressView:

在Xcode中声明必要的变量和 IBOutlet/IBAction:
#import
<UIKit/UIKit.h>
#import
"ASIFormDataRequest.h"
#import
"ASIHTTPRequest.h"
@interface
UploadViewController : UIViewController {
UIBarItem
*
button
;
UIWebView
*
webView
;
UIProgressView
*
progress
;
ASIFormDataRequest
*
request
;
NSURL
*
url
;
}
@property
(
retain
,
nonatomic
)
IBOutlet
UIBarItem* button;
@property
(
retain
,
nonatomic
)
IBOutlet
UIProgressView* progress;
@property
(
retain
,
nonatomic
)
IBOutlet
UIWebView* webView;
-(
IBAction
)go;
-(
void
)printBytes:(
NSString
*)str encoding:(
NSStringEncoding
)enc;
@end
将所有出口正确地连接到 UpdateController.xib 中,保存。
打开MainWindow.xib,拖一个UIViewController进去并将其Identifier改为UpdateController,再将它连接到Window对象的的rootViewController。
编写 UIButton 的 Touch up inside 事件代码如下:
-(
IBAction
)go{
NSString
* s=
@"
哈哈哈
"
;
url
=[
NSURL
URLWithString
:
@"http://localhost:8080/test/UploadServlet"
];
request
= [
ASIFormDataRequest
requestWithURL
:
url
];
//
字符串使用
GBK
编码,因为
servlet
只识别
GBK
NSStringEncoding
enc=
CFStringConvertEncodingToNSStringEncoding
(
kCFStringEncodingMacChineseSimp
);
[
request
setStringEncoding
:enc];
[
self
printBytes
:s
encoding
:enc];
//
打印
GBK
编码字符
[
request
setPostValue
:s
forKey
:
@"title"
];
[
request
setFile
:
@"/Users/kmyhy/Documents/iphone/Iphone
开发介绍
.doc"
forKey
:
@"attach"
];
[
request
setDelegate
:
self
];
[
request
setDidFinishSelector
:
@selector
(
responseComplete
)];
[
request
setDidFailSelector
:
@selector
(responseFailed)];
[
button
setEnabled
:
NO
];
[
request
startSynchronous
];
}
-(
void
)responseComplete{
//
请求响应结束,返回
responseString
NSString
*responseString = [
request
responseString
];
[
webView
loadHTMLString
:responseString
baseURL
:
url
];
[
button
setEnabled
:
YES
];
}
-(
void
)respnoseFailed{
//
请求响应失败,返回错误信息
NSError
*error = [
request
error
];
[
webView
loadHTMLString
:[error
description
]
baseURL
:
url
];
[
button
setEnabled
:
YES
];
}
-(
void
)printBytes:(
NSString
*)str
encoding:(
NSStringEncoding
)enc{
NSLog
(
@"defaultCStringEncoding:%d"
,[
NSString
defaultCStringEncoding
]);
//
根据给定的字符编码,打印出编码后的字符数组
const
char
*bytes=
[str
cStringUsingEncoding
:enc];
for
(
int
i=
0
;i<
strlen
(bytes);i++)
{
NSLog
(
@"%d
%X"
,(i+
1
),bytes[i]);
}
}
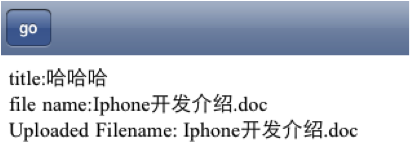
编译、运行。点击go按钮,程序运行效果如下:
分享到:


相关推荐
ASIHTTPRequest 是一个围绕 CFNetwork API的易于使用的包装器,它使与 Web 服务器通信的一些更乏味的方面变得更容易。 它是用 Objective-C 编写的,适用于 Mac OS X 和 iPhone 应用程序。 它适用于执行基本的HTTP...
ASIHTTPRequest,用于获取下载及其相关处理与应用的功能函数
ASIHTTPRequest第三方库
ASIHTTPRequest+UITableView实现多个下载任务,没用到重用机制,还有没有实现断点续载,很简单的一个demo,相信初学者都能看懂,还写了一些注释。
使用iOS SDK中的HTTP网络请求API,ASIHTTPRequest就是一个对CFNetwork API进行了封装,并且使用起来非常简单的一套API,
ASIHTTPRequest第三方下载工具,这里写了同步和异步下载的两个实例
asihttprequest是目前做移动平台游戏上比较便捷的http通信第三方库
ios开发框架 ASIHttpRequest 资源来源于网上 非原创
这时ios中的使用asihttp类库上传文件到php服务器,关于php服务器接收文件见我的另一篇文章
ASIHTTPRequest 源码 、底层构架
使用iOS SDK中的HTTP网络请求API,相当的复杂,调用很繁琐,ASIHTTPRequest就是一个对CFNetwork API进行了封装,并且使用起来非常简单的一套API,用Objective-C编写,可以很好的应用在Mac OS X系统和iOS平台的应用...
ASIHTTPRequest实现资源的下载,断点续传
ASIHTTPRequest使用介绍
该demo最主要的功能是在用ASIHttpRequest 下载,(当然同样也适用于上传),在弹出的alert框中显示下载(或是上传数据)的进度 在这里注意:如果是下载较大的文件,进度条会缓慢进行;相反如果下载的文件很小,那...
ASIHTTPRequest是简单易用的,它封装了CFNetwork API。使得与Web服务器通信变得更简单。它是用Objective-C编写的,可以在MAC OS X和iPhone应用中使用。 它适用于执行基本的HTTP请求和互动(或者说是反馈)。...